Elsa Birthday Cake
Characters from the movie Frozen have been a favorite cake design choice for birthday parties. I have made a few Frozen-themed cakes, but this is my first Elsa birthday cake in her blue dress. The last time I had an opportunity to bake an Elsa cake, I couldn't find the doll in the blue dress because she was SO popular! We went with her other dress instead, as she was more readily available. Now that it has been a little while since the movie came out, you can find both dolls. I had a blast making this cake for my neighbors to bring to their daughter's house for their granddaughter's 4th birthday! Do you want to make your own Elsa cake from the movie Frozen? Here are some step-by-step instructions.
Bake your cakes
First buy the doll you like. I chose the basic Elsa doll with a top dress molded from plastic and a fabric skirt. This serves three purposes: it is more affordable than the full dress version, slightly smaller, and because her top is designed, you won't need to frost intricate small things for the top part of her dress.
To bake the cake you should use a Wilton wonder mold for a doll cake and a standard 8" round cake pan. If you don't have this pan, you may also use a Pampered Chef large batter bowl. I've never tried this, but every Pampered Chef sales representative swears by it for baking.
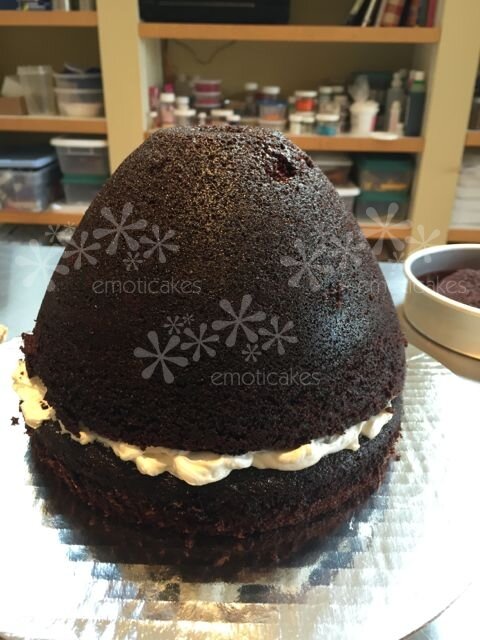
Bake a recipe and a half of your favorite cake so that you have enough to fill the mold and the 8" layer cake pan. Bake the cake according to the pan instructions, keeping in mind that it takes a long time to bake a cake in this wonder mold pan. Allow the cakes to cool.
Decorate
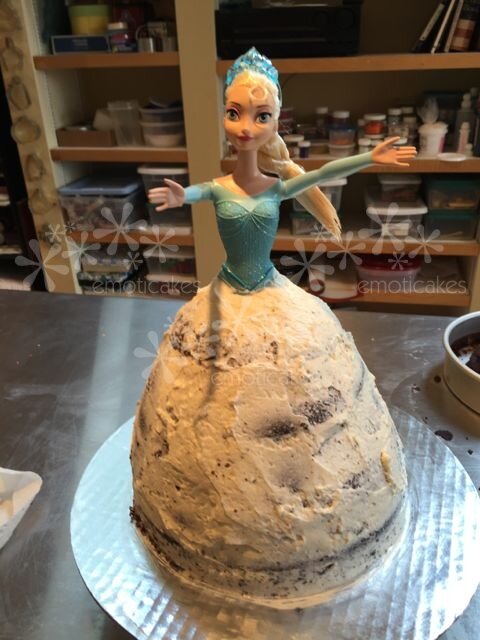
You may choose to work with fondant and buttercream, or just buttercream. I chose to work with fondant and buttercream for the added smoothness that fondant provides. First, lay your 8" round cake on the cake board and then spread a nice layer of buttercream on top of this layer. Top with the wonder mold cake. At this point, stand your Elsa next to your cake and see if you need more height. For my doll, I needed a fair amount of height, so I split the wonder mold cake in a couple of places and added frosting layers. This served the purpose of adding height while also improving the cake to frosting ratio. Once you've done any splitting and filling you need to do, crumb coat the cake and then put Elsa into the center of your cake.

Add Fondant
You'll want to try to match the top part of Elsa's dress when you color your fondant. I used mostly sky blue with just a little drop of Royal Blue. Mix your fondant until there are no streaks left and it is evenly colored. Roll it out to between 1/8" and 1/4" thickness. Once you've rolled a large enough slice of fondant, remove the doll _(the reason to have added it was to make sure she didn't stick out of the cake beyond where she should)_ and then cover the skirt with the fondant. After you put Elsa back into the cake, you're ready to embellish. Roll out white gum paste or fondant to make the accent pieces for her dress. Use royal icing or other hardening icing to add snowflake accents to the white parts of her dress, add a ribbon around her waist etc. This is the place where you can really put your own spin on things! This Elsa birthday cake was baked to celebrate Kate's 4th birthday, and her grandparents wanted the cake to say Happy 4th Birthday Kate. I considered using the cake base for writing. This is something I often do when making a doll cake. However, I hadn't left too much room on the edges and I thought it would be fun to mix things up a little. I added little round circles and used edible marker to write the birthday message on the cake. A little bit of drying and icing and they stayed nicely on the cake.

Tips for Success
When baking shaped cakes and working with fondant, I find these tips helpful. 1. Make sure that your pan is thoroughly greased and floured or sprayed well with Pam for Baking or similar spray. 2. Let your cake cool for a long time in the pan. I let this cool for several hours before un-molding. She popped right out and I wasn't worried about the cake falling apart during the process. 3. Take your time when you're working with fondant. It is challenging to cover a larger surface and can feel stressful. Stressing out just makes it more likely that you'll have trouble covering the surface. Take things slow, make sure you measure well and be patient. 4. If you do make mistakes with the base layer of fondant, remember that you have a lot of opportunity to embellish! You can cover those mistakes with embellishments.