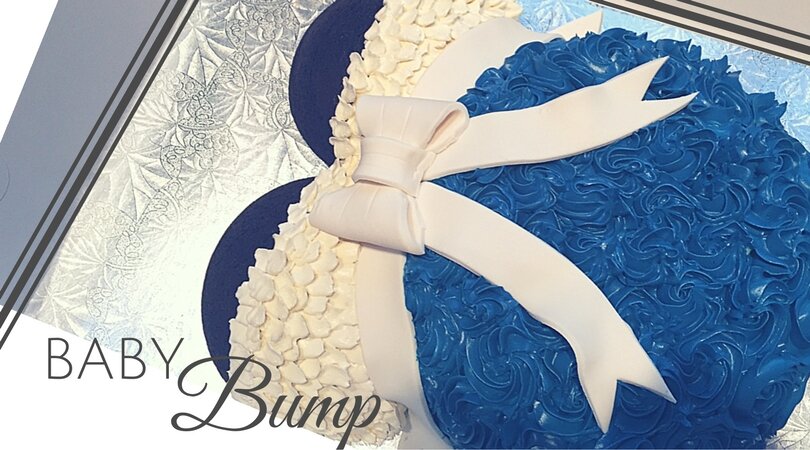
Baby Bump Cake
I received a request to make a baby bump cake for a baby shower. The woman throwing the shower sent me a picture as a cake model. This post will give you the step-by-step instructions to recreate this cake. Personalize it by choosing any color you love, adding different adornments and just have fun!
Step One - Bake
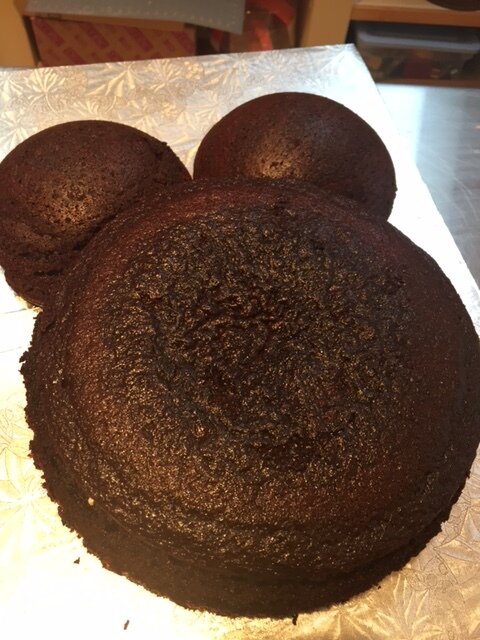
Your first step to make your own baby bump cake is to bake the cakes. The Mom-to-be wanted chocolate cake! I used the Wilton Sports Ball pan, a 10" round pan and an 9" round pan. For the 10" round and 9" round cakes, you can line the bottoms with parchment. However for the ball pans, you need to either use Pam for Baking or another release spray for baking OR you can grease your pan well and dust with cocoa. If you are baking a vanilla cake, you can use flour to line the pan.


Step Two - Assemble
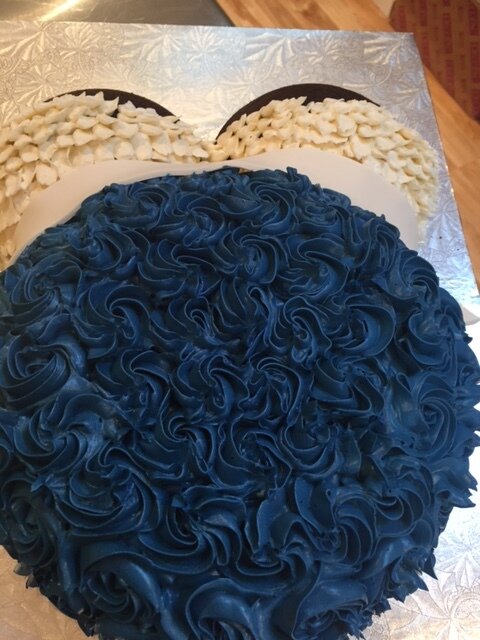
As you can see from the cake model, the belly part of the cake needs to be a little bit proud. After all, we are baking a cake for an expectant mother! Stack your 9" cake on top of the 10 inch cake and sculpt a bit to achieve this look. Of course, a picture is worth a thousand words, so we have pictures below. Lay the pieces near each other. Notice that the 10" cake is a little bit proud. Typically you level a cake, but in this case the added height in the middle is actually helpful. Spread a layer of frosting on top of the 10" cake and top it with your 9" cake. Then, use buttercream to crumb frost the belly portion of the cake.

Now your cake is covered with a crumb layer of buttercream and it is ready to be decorated. Notice that we do not crumb coat the top portion of the body of the cake.
Step Three - Decorate
To decorate the cake, use a ruffle tip (103 or 104) and a 1M tip. Prepare one piping bag with the ruffle tip and prepare another piping bag with a 1M. For this cake, I matched the color of the model cake. However, this is your opportunity to be creative with color!
Use your 103 or 104 tip and pipe little ruffles for the top of the dress. Start at the bottom (near the belly of the cake) and work upward. Be careful to cover all the cake so that it truly looks like the top of a dress. Also remember to stop with some of the cake showing so it looks like a sundress.

After your rosettes are all piped onto the belly of the cake, roll out a 50/50 mix of gum paste and fondant. Use a knife, ravioli cutter, or ribbon tool to cut a ribbon to go between the top and bottom of the dress. Lay the ribbon on the cake.
Step Four - Make the Bow
Anyone who has ever made a bow with ribbon can rest assured that making a bow with a 50/50 fondant gum paste mix is easier. Easier? How can that be? Trust me -- it really is not that hard! The addition of gum paste makes the mixture nice and stretchy but since we use half fondant, it doesn't dry rock hard. Roll out the mixture and use a ribbon cutter, ravioli cutter or knife to cut it into a long piece. Cut two pieces to be your hanging ribbons. Pinch the tops together a bit so that they taper in and cut the ends in a way that is pleasing to you. Lay them on the cake.


Then, take two equal pieces of your cut ribbon and fold them over to look like the loops of a bow. Then, take a center piece to wrap around the two edges. A knife or gum paste tool to makes indentations in your bow. Use straws to hold the ribbon up as it dries enough to hold its shape. Let it sit until it hardens up enough to move, about a half hour. Add to your cake.

Finished Baby Bump Cake
Now your baby bump cake is complete! Take it to your baby shower and enjoy with the Mom-to-be as you celebrate and open presents.