A Cheshire Cat Cake
He's a perennial favorite with kids young and old. That quirky cat in Alice in Wonderland makes everyone smile. Penelope LOVES to read and she adores the Cheshire cat. Just this spring, our local middle school performed Alice in Wonderland and the Cheshire cat stole the show. Dressed in an amazing costume with some pretty awesome hair, he captured the hearts of all in the audience. Penelope went to the play and her Mom thought that a cake combining the cat and books would be perfect for her daughter's 5th birthday. I decided we'd focus on the cat and make a Cheshire cat cake.
Design the Cake
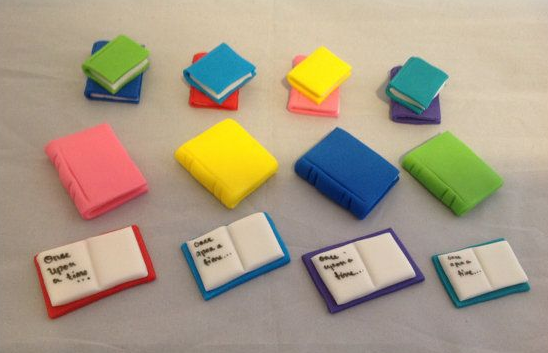
Every cake starts off with a design process and this Cheshire cat cake was no exception. How best to combine the Cheshire cat and the books while still keeping the price reasonable and the number of servings in line with what was needed for the party? I started to sketch some things out and consider different options. The cat face was easy: I found a great example of Cheshire cat clip art online and printed it out. But, what to do with it? I had decided that it would make sense to do just the face, and found a couple of inspiration cake pictures to send to Penelope's Mom. We needed to serve about 30 people and her Mom liked the idea of tiering to help feature the cat! We agreed that I'd combine the elements of books and the cat and she would trust my judgement from there. I've included the inspiration Cheshire cat cakes and fondant books below.


Ready, Set, Cake!
I was playing with cake pans and drawings one day when my husband popped into my kitchen and asked how the design was going. I had decided on a sheet cake with a round cake on top, but wasn't sure how I wanted to involve the books exactly. He suggested a curved layout with the books arranged in an arc spelling out her name with the Cheshire cat cake placed on the top. Once the design was set, it was time to bake - CHOCOLATE with pink and purple buttercream.

Make the Cat and the Books
Use a fondant container or other round container and cut out the cat features from the printout. Lay each piece on the top of parchment paper, layering and affixing the layers together with Royal Icing. Allow your cat to dry for several days so that it can stand up around the 6" top cake. For the books, roll out single layers of colored fondant and cut them into rectangles. Then roll out a rectangle of white fondant just a little bit smaller than half of the rectangle of colored fondant. Place that inside the rectangle and pull the colored fondant over the white to make the top cover. Allow to dry along with the cat before using these on the cake. Watch this tutorial for more information about making the books

Complete the Cake
The day you are ready to bake your cake, bake a 1/4 sheet cake and a 6" round cake. Then, frost the 6" cake with pink frosting. I used a rough textured edge and top for the 6" cake and frost the 1/4 sheet cake with a smooth layer of pink frosting. Next, roll out lavender fondant and cut it into strips. I used alternating 1" and 1/2" strips for variety for the cake. Lay them across the back 3/4 of the cake and trim the sides. Place your cake in the freezer to chill. Once your top cake is complete you can lay out your design on the 1/4 sheet cake. I placed a 6" parchment circle on the top of the cake to hold the spot for the Cheshire Cat cake as I arranged the books. After this point, I simply placed 4 straws in the base cake layer to support the top cake and then gently laid the top cake on the 1/4 sheet cake. I added the eyes and nose for the Cheshire cat after putting him on the top of the cake. To keep them in the cake, I used a single toothpick in each one to insert it into the cake. I also used Royal Icing as extra insurance.